
Introduction:
Selenium has a authorized site where you can have information about new updates, documentation, downloads related along with the versions they have updated. Even you can additional support from this site.
Web Site details - URL : https://www.seleniumhq.org/

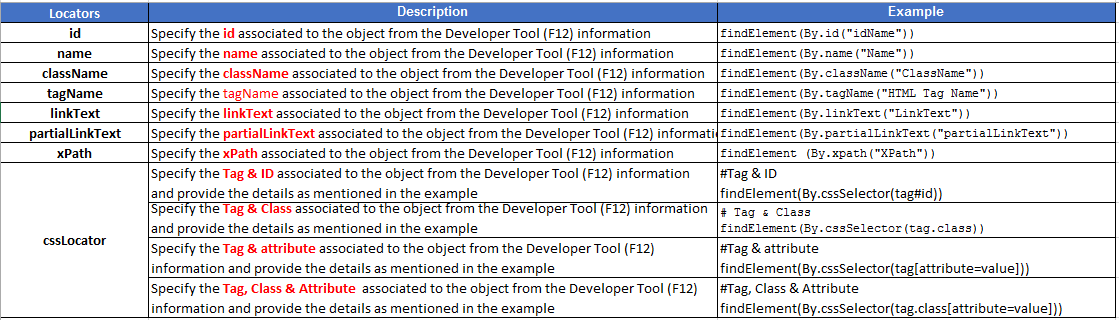
Selenium Locators: Once you are familiar with these locators, you will get enough confidence to start your selenium automation.

Table Examples

There are few techniques available in XPath where in you can easily identify the GUI dynamic objects without any waste of time. Refer the above snapshot to under the below example
Syntax = //tagname[@attribute=’Value‘]
Example = //input[@id=’user-message‘]
There are two type of Xpaths:
View the following topic on the posts for more details
Selenium has four components
- Selenium Integrated Development Environment (IDE) - It is a Firefox-add on and it is very helpful to you in building the automation script based on your manual navigation using Record & Play mechanism.
- Selenium Remote Control (RC) - Allows you to write automation scripts in any programming language against any HTTP website.
- WebDriver - Makes direct calls to the browser that your using to build the automation.
- Selenium Grid - Allows you run your automation scripts on different machines against different browsers in parallel at the same time
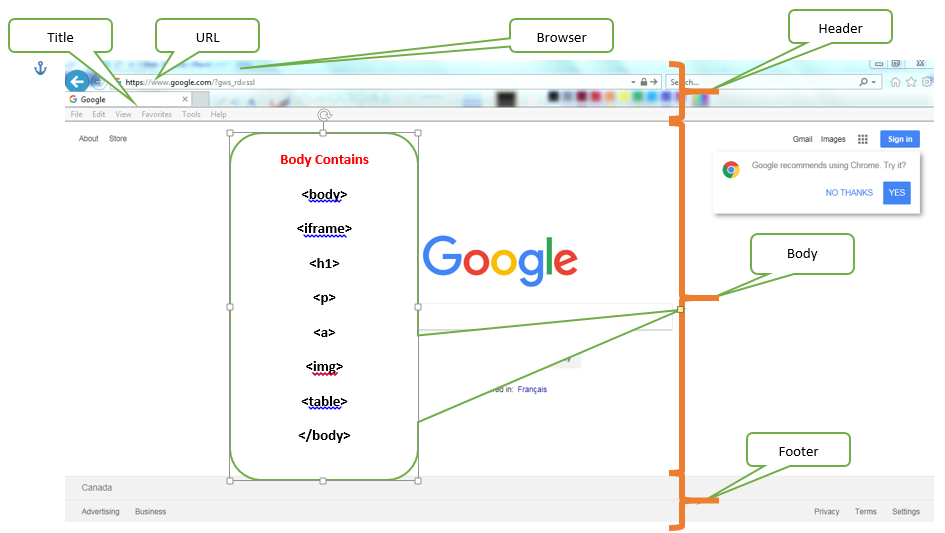
GUI - Objects Architecture:
Here, would like to explain web application (Web Browser) objects types and action that can be performed in simple way. Selenium supports automation only on GUI / Web Browser applications. Hence, will discuss only GUI objects and its hierarchy. See the Web Browser Architecture shown below.
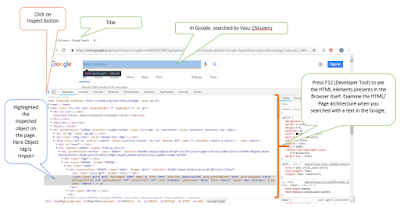
You will experience the same architecture explained above using Developer Tool on your Web Browser. To experience the same, navigate to any browser and press function key F12 on the keyboard or open Developer Tool and click on the inspect button and enjoy building the confidence to start automating using Selenium. Here is the snapshot.

What you should know to learn Selenium ?
Steps involved while you wanted to learn Selenium
- You should know Core Java in first place and practice on any Java online compiler for few weeks till you get confidence.
- Learn about Selenium Locators, how it recognizes the UI objects (see the above details)
- Install latest JDK
- Now, Install Eclipse/IntelliJ IDE on your desktop.
- Install Maven
- Install Cucumber/Jbehave for BDD (if required)
- Also, install Selenium IDE (for record and Play)
- Also, install firebug / firepath (to get the GUI object HTML properties easily without Developer Tool or F12 Key)
- Having complete set up start with few Selenium examples
- Try using different types of Page Object Models or Frameworks
What you should know to start automation in Selenium ?
Steps involved while you wanted to automate using Selenium
- Open the browser with any of your desired application
- Right click on the desired object and click on Inspect Element
- As shown in the below example try to locate the locators (highlighted with yellow background) of your required GUI objects.
- Start building the code as per the requirements
- Run the program
Sample Selenium Code:
import org.openqa.selenium.WebDriver;
import org.openqa.selenium.firefox.FirefoxDriver;

public class SeleniumSampleDemo {

    public static void main(String[] args) {
        // declaration and instantiation
     System.setProperty("webdriver.firefox.marionette","D:\\geckodriver.exe");
 WebDriver driver = new FirefoxDriver();

        String appUrl = "www.google.co.in";
        String expectedTitle = "Google";
        String actualTitle = "";

        // launch Fire fox and direct it to the Base URL
        driver.get(appUrl);

        // get the actual value of the title
        actualTitle = driver.getTitle();


        if (actualTitle.contentEquals(expectedTitle)){
            System.out.println("Test Passed!");
        } else {
            System.out.println("Test Failed");
        }
       driver.findElement(By.name("q")).sendKeys("Vasu Chiluveru");
       driver.findElement(By.name("btnK")).Click;

       driver.close();
    }

}
- Open the browser with any of your desired application
- Right click on the desired object and click on Inspect Element
- As shown in the below example try to locate the locators (highlighted with yellow background) of your required GUI objects.
- Start building the code as per the requirements
- Run the program
Sample Selenium Code:
import org.openqa.selenium.WebDriver; import org.openqa.selenium.firefox.FirefoxDriver; public class SeleniumSampleDemo { public static void main(String[] args) { // declaration and instantiation System.setProperty("webdriver.firefox.marionette","D:\\geckodriver.exe"); WebDriver driver = new FirefoxDriver(); String appUrl = "www.google.co.in"; String expectedTitle = "Google"; String actualTitle = ""; // launch Fire fox and direct it to the Base URL driver.get(appUrl); // get the actual value of the title actualTitle = driver.getTitle(); if (actualTitle.contentEquals(expectedTitle)){ System.out.println("Test Passed!"); } else { System.out.println("Test Failed"); } driver.findElement(By.name("q")).sendKeys("Vasu Chiluveru"); driver.findElement(By.name("btnK")).Click; driver.close(); } }
Basic coding operations on Selenium:
Selenium Locators: Once you are familiar with these locators, you will get enough confidence to start your selenium automation.
Intermediate coding operations on Selenium:
- Browser Examples
- Pages Examples
- Menu Examples
- Keyboard Examples
- Mouse Examples
- Wait Examples
- Alert or Pop ups Examples
- Window & Frame Examples
- Locator Examples
- GUI Objects Examples
Browser Examples
Pages Examples
IE

//Set the web driver
System.setProperty("webdriver.ie.driver", "pathofchromedriver\\IEDriverServer.exe");
//Initialize browser
WebDriver driver=new InternetExplorerDriver ();
//Open google
driver.get("http://www.google.com");

NOTE: you have to download the IEDriverServer.exe already


Chrome

//Set the web driver
System.setProperty("webdriver.chrome.driver", "pathofthe exe file\\chromedriver.exe");
//Initialize browser
WebDriver driver=new ChromeDriver();
//Open facebook
driver.get("http://www.facebook.com");

NOTE: you have to download the chromedriver.exe already


Firefox
//Initialize browser
WebDriver driver=new FirefoxDriver();
//Open facebook
driver.get("http://www.facebook.com");


Close the Browser
driver.close();

Close all the Browsers
driver.quit();
Pages Examples
//Maximize the browser

     driver.manage().window().maximize();

//Get the Page Name or Title
     String strPageTitle = driver.getTitle();
     System.out.println("Page title: - "+strPageTitle);

//Moving page Forward, Backward, Refresh and Navigate to

    driver.navigate().forward();

    driver.navigate().back();

    driver.navigate().refresh();

    driver.navigate().to(“www.gmail.com/inbox”);

//Get the particular page content/text/page

    String pageSource = driver.getPageSource();

//Search for a particular text / label on the page

    WebDriverWait wait = new WebDriverWait(driver, 10);
    wait.until(ExpectedConditions.presenceOfElementLocated(By.xpath("//*[contains(.,'Welcome to the page!')]")));

//Capture screenshot
Case 1: To store at particular drive
// Take screenshot and store as a file format
File src= ((TakesScreenshot)driver).getScreenshotAs(OutputType.FILE);
try {
   // now copy the  screenshot to desired location using copyFile
   FileUtils.copyFile(src,new File("C:/selenium/error.png"));
    }
catch (IOException e) {
   System.out.println(e.getMessage());
}

Case 2: To store at your project workspace
// Take screenshot and store as a file format
File src= ((TakesScreenshot)driver).getScreenshotAs(OutputType.FILE);
try {
   //now copy the  screenshot to desired location using copyFile
   File targetFile = new File("Screenshots" + fileSeperator +"Results" + fileSeperator + testName, screenShotName);
   FileUtils.copyFile(src, targetFile);
}
catch (IOException e) {
   System.out.println(e.getMessage());
}
Menu Examples
Keyboard Examples
WebElement menu= driver.findElement(By.xpath("//b[contains(., 'Menu')]"));
new Actions(driver).moveToElement(menu).perform();

WebElement nextMenu= new WebDriverWait(driver, 5).until(ExpectedConditions.elementToBeClickable(By.id("nextMenu")));
new Actions(driver).moveToElement(nextMenu).perform();

WebElement anotherMenu= new WebDriverWait(driver, 5).until(ExpectedConditions.elementToBeClickable(By.id("anotherMenu")));
anotherMenu.click();
Keyboard Examples
robot.delay(5000);
java.awt.Robot robot = null;

try {
    robot = new java.awt.Robot();
    robot.keyPress(KeyEvent.VK_ENTER);
} catch (AWTException e) {
    e.printStackTrace();
}

robot.delay(5000);
robot.keyPress(KeyEvent.VK_CONTROL);
robot.keyPress(KeyEvent.VK_SHIFT);
robot.keyPress(KeyEvent.VK_S);
robot.delay(5000);
Mouse Examples
//Right Click

Actions actions = new Actions(driver);
actions.contextClick(PRODUCT_CATEGORY).build().perform();


//Double Click

Actions actions = new Actions(driver);
actions.doubleClick(PRODUCT_CATEGORY).build().perform();


//Mouse Hover on Menu or CSS text

Actions actions=new Actions(driver);
WebElement PRODUCT_CATEGORY = driver.findElement(By.xpath(“//div[@id=’menu1’]/div”));
actions.moveToElement(PRODUCT_CATEGORY);
actions.build().perform();


//Scroll the screen using Java script

JavascriptExecutor jscript = (JavascriptExecutor) driver;
Jscript.executeScript(“javascript:window.scrollBy(250,350);


//Drag & Drop

WebElement source = driver.findElement(By.name(“source”));
WebElement target = driver.findElement(By.name(“target”));
Actions action = new Actions(driver);
action.dragAndDrop(source,target);
action.build().perform();
Wait Examples
//Implicit wait

driver.manage().timeouts().implicitlyWait(10,
TimeUnit.SECONDS);

//Explicit Wait

WebDriverWait wait = new WebDriverWait(driver, 10);
WebElement element = wait.until(ExpectedConditions.elementToBeClickable(By.id("someid")))

//Fluent Wait (Customized wait)
// Waiting 30 seconds for an element to be present on the page, checking

  // for its presence once every 5 seconds.
  Wait wait = new FluentWait(driver)
     .withTimeout(30, SECONDS)
     .pollingEvery(5, SECONDS)
     .ignoring(NoSuchElementException.class);


   WebElement foo = wait.until(new Function() {
     public WebElement apply(WebDriver driver) {
        return driver.findElement(By.id("foo"));
    }
  }


//Wait until that element present (Fixed Wait)


Case 1:

//To wait for element visible

WebDriverWait waitForElement = new WebDriverWait(driver, 15);
waitForElement.until(ExpectedConditions.visibilityOfElementLocated(By.xpath("//input[@id='text3']")));


Case 2:

// Create new WebDriver wait

WebDriverWait waitAlert = new WebDriverWait(driver, 10);

// Wait for Alert to be present
Alert myAlert = waitAlert.until(ExpectedConditions.alertIsPresent());


Case 3:

WebElement myDynamicElement = (new WebDriverWait(driver, 20))
      .until(ExpectedConditions.presenceOfElementLocated(By.id("myDynamicElement")));
Alert or Pop ups Examples
//Handling Alerts/Pop ups windows

Alert alert = driver.switchTo().alert();
alert.accept(); //clicks on continue button
alert.dismiss(); //clicks on cancel button
String expectedPopupText = “Vasu Chiluveru” // use below code is to validate the text on Alert window
String actualPopupText = alert.getText();
Assert.assertEquals(“Text doesn’t Match”, expectedPopupText, actualPopupText);
Window & Frame Examples
//Moving between Windows and Frames

For (String handle : driver.getWindowHandler()){
         driver.switchTo().window(handle);
}


//Handling multiple Windows

Set <String> AllWindowHandles = driver.getWindowHandler();
String window1 = (String) AllWindowHandles.toArray()[0];
String window2= (String) AllWindowHandles.toArray()[1];
driver.switchTo().window(window2);
driver.switchTo().window(window1);
Locator Examples
//By Xpath

driver.findElement(By.xpath("//input[@id='text3']")).sendKeys("My Name is Vasu Chiluveru");

//By Name

driver.findElement(By.name("firstName")).sendKeys("My Name is Vasu Chiluveru");

//By ID

driver.findElement(By.id("firstName")).sendKeys("My Name is Vasu Chiluveru");

//By LinkText

driver.findElement(By.linkText("download")).click();

//By PartialLinkText

driver.findElement(By. partialLinkText ("down")).click();

//By TagName

driver.findElement(By. tagName ("table"))

Example:

Select select = new Select(driver.findElement(By.tagName("Calender")));
select.selectByVisibleText("Nov");

//By ClassName

driver.findElement(By.ClassName("firstName")).sendKeys("My Name is Vasu Chiluveru");

//By CSS Locator

driver.findElements(By.cssSelector("input[id=firstName]")).sendKeys("My Name is Vasu Chiluveru");

or

driver.findElements(By.cssSelector("input[name=firstName]")).sendKeys("My Name is Vasu Chiluveru");
GUI Objects Examples
//Edit Box - assign Input and get the value

driver.findElement(By.name("firstName")).sendKeys("My Name is Vasu Chiluveru");
String fName = driver.findElement(By.name("firstName")).getText();

//Click on Button

driver.findElement(By.xpath("//input[@value='Login' and @type='submit']")).click();

//Radio Button

Case 1:

WebElement radioBtn = driver.findElement(By.id("radiobutton"));
radioBtn.click();

Case 2:

// Store all the elements of same category in the list of WebElements

List oRadioButton = driver.findElements(By.name("radButton"));

  //Create a boolean variable which will hold the value (True/False)
  boolean bValue = false;
  // This statement will return True, in case of first Radio button is selected
  bValue = oRadioButton.get(0).isSelected();

  // This will check that if the bValue is True means if the first radio button is selected
  if(bValue = true){
     // This will select Second radio button, if the first radio button is selected by default
    oRadioButton.get(1).click();
    }else{
     // If the first radio button is not selected by default, the first will be selected
    oRadioButton.get(0).click();
}


//Check Box
List oCheckBox = driver.findElements(By.name("tool"));
   // This will tell you the number of checkboxes are present
   int iSize = oCheckBox.size();
   // Start the loop from first checkbox to last checkbox
   for(int i=0; i < iSize ; i++ ){
   // Store the checkbox name to the string variable,using 'Value' attribute
   String sValue = oCheckBox.get(i).getAttribute("value");
   // Select the checkbox it the value of the checkbox is same what you are looking for
   if (sValue.equalsIgnoreCase("toolsqa")){
       oCheckBox.get(i).click();
       // This will take the execution out of for loop
       break;
   }
 }


//List Box

WebElement element = driver.findElement(By.id("Country"));
Select oSelect = new Select(element);

Or

Select oSelect = new Select(driver.findElement(By.id("Country")));

//Below are other actions you can perform on the List box or Combo box
             oSelect.deselectAll();
             oSelect.selectByIndex(int);
             oSelect.selectByValue(String);
             oSelect.selectByVisibleText(String);
             oSelect.getFirstSelectedOption(); and so on etc.,
Table Examples
List rows = driver.findElements(By.xpath("//*[@id=\"search-results\"]/tbody/tr"));
List col = driver.findElements(By.xpath(".//*[@id=\"search-results\"]/thead/tr/th"));
 System.out.println("No of rows are : " + rows.size());
 System.out.println("No of cols are : " + col.size());
 for (int tabRow= 1; tabRow < col.size(); tabRow++) {
       switch (tabRow) {
  case 1: driver.findElement(By.xpath(".//*[@id=\"j_id4"+tabRow+"4\"]/button")).click();
                 Thread.sleep(5000);
                 driver.findElement(By.xpath(".//*[@id=\"j_id4"+tabRow+"4\"]/button")).click();
   Thread.sleep(5000);
   break;
  case 2: driver.findElement(By.xpath(".//*[@id=\"j_id4"+tabRow+"8\"]/button")).click();
                 Thread.sleep(5000);
   driver.findElement(By.xpath(".//*[@id=\"j_id4"+tabRow+"8\"]/button")).click();
   Thread.sleep(5000);
   break;
 }
}
Need of Xpath and Examples
Generally, the GUI objects will be identify by the locators id,
name, class etc., however it is very difficult to identify the dynamic object on
the DOM. Dynamic Object Model (DOM) is an application programming interface
(API) for HTML and XML documents, it defines the logical architecture as shown
above.

There are few techniques available in XPath where in you can easily identify the GUI dynamic objects without any waste of time. Refer the above snapshot to under the below example
Syntax = //tagname[@attribute=’Value‘]
Example = //input[@id=’user-message‘]
There are two type of Xpaths:
- Absolute Xpath – Refers to complete path of an object on the page, denotes by single slash i.e., / Example: /html/body/div[2]/div/div[2]/div[1]/div[2]/form/div/input
- Relative Xpath – Refers to a path of an object on the page from a landmark, denotes by double slash i.e., Example: //form/div/input
Few Xpath Keywords
- Contains - //tagname[contains(@attribute, ‘value‘)] – Checks for the value given in the code on your web page
- Starts-with - //tagname[starts-with(@attribute, ‘value‘)] – Checks for the value given in the code that starts with on your web page
- Multiple Xpaths - //tagname[@attribute=’Value‘]//tagname[@attribute=’Value‘] – Checks for the values given in both the xpaths code on your web page
- Operator “or” - //tagname[@attribute=’Value‘ or @attribute=’Value‘] – Checks for the values given in the code that is there on your web page at least one value from both of them
- Operator “and” - //tagname[@attribute=’Value‘ and @attribute=’Value‘] - Checks for the values given in the code that is there both the values on your web page
- Text - //tagname [text()=’text value‘] - Checks for the value given in the code that is present on your web page
- Ancestor - //*[@class=’ClassName’’]//ancestor::div - First, it finds the class which class is “ClassName” and then, starts finding div elements in the page.
- Following - //tagname[@id=’idName’]//following::input - First, it finds the form which id is “’idName” and then starts to find all input elements after that node.
- Child - //*[@class=’ClassName’]//ul[@id=’idName’]/child::li - Selects all children elements of the current node.
- Preceding - //img[contains(@src,’srcName’)]//preceding::li - First, will locate the bottom element, then use preceding with “li” to find all “li” elements
- Following-sibling - //*[@class=’className’]/child::div[2]//*[@class=’className’]//following-sibling::li - First, will locate child div elements, and then li elements of following li siblings
- Descendant - //*[@class=’className’]//*[@id=’idName’]//descendant::li - First, will locate className, and then descendant li elements
- Parent - //*[@id=’idName’]/button//parent::form - Finds the parent name of the button
- Locate an Element inside Array of Elements –
- //span[contains(text(),’tableValue’)]
- (//span[contains(text(),’tableValue’)])[1]
- (//span[contains(text(),’tableValue’)])[1]/following-sibling::strong[@class=’className’]
View the following topic on the posts for more details
- Need of XPath and Examples
- What is the difference between normal Java Project and Maven Project?
- Sample Behavioral Driven Development (BDD) Project for your reference


No comments:
Post a Comment