
Introduction
As stated in Objective of this Blog, here with showing few applications/technologies objects how that are recognized by the UFT tool. Once you are familiar in coding with any one the technology rest will be very easy for you.
Here, would like to explain web application (Web Browser) objects types and action that can be performed in simple way. See the Web Browser Architecture shown below.

You, will be familiar in designing the automation without any doubt once you are through on the below objects operations described below.
Basic operations and example with description
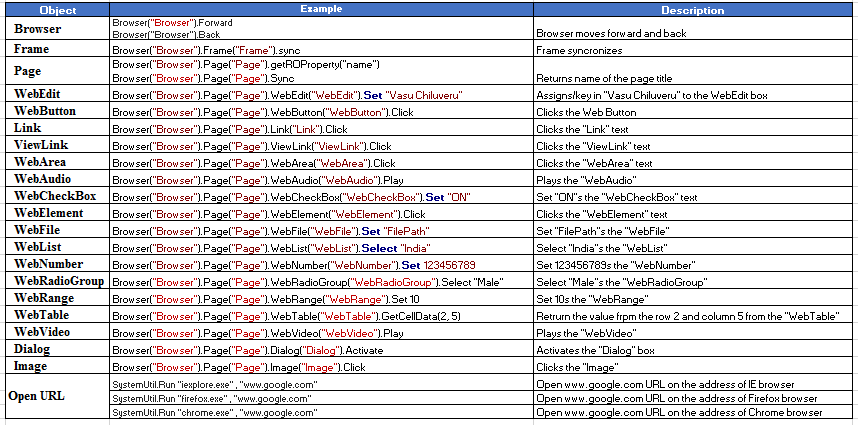
Below are the methods that are mostly common for all the objects

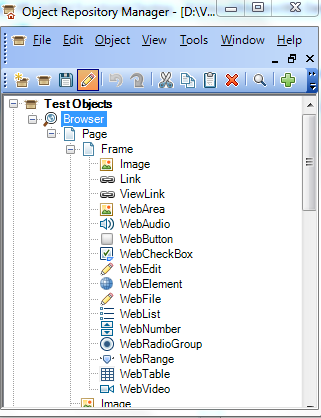
Object Repository (OR) - Pattern
Very Important suggestion, if your OR structure or hierarchy is well organized then the automation coding readability will increase and also it is very easy to understand by any automation tester. In future also maintenance of the automation suit will become non-tedious job and reduces turn around time for any future change request. The hierarchy should be as shown in above figure, like Browser >> Page >> [Frame]>> GUI Objects.Ensure all objects of single page remain to the page itself. Don't scatter the objects as you like as later point in time it will become very time taking process to any one to get the right page/place of the desired object. Maintain the same page name for your page object in the OR for easy identification.
Example. In any website, the Login Page will have User Name, Password and Submit, Cancel button objects only; in similar fashion these objects should reflect under Login page page object only in the OR.
OR Example:
1. OR With Frame - Object Repository has Test Objects and their Object properties.
2. OR Without Frame: Object Repository has Test Objects and their Object properties.

What you should know to learn QTP/UFT?
Steps involved while you wanted to learn QTP/UFT
- Learn VB Script in first place.
- Know about UFT tool features
- Know about UFT functionalities/flavors
- Object Repository
- Actions/Functions
- Parameters
- Checkpoints
- Recovery Scenarios
- Regular expressions
- Descriptive programming
- Working with 3rd party tools/applications like notepad, excel, word document, SQL database etc (Use CreateObject)
- Virtual Object
- Automation Framework
What you should know to start automation using UFT?
Steps involved while you wanted to automate using UFT
- Open UFT tool and save a test script with any name
- Next, open your application that you wanted to automate (do not open your application before opening UFT tool)
- In the first place, start adding desired objects (all objects) in one go and store all of them in Object Repository. Better to use one global Object Repository to each of your module or application based on the complexity. See the steps involved below.
- Click on Object Spy
 button
 - Use the pointing hand from the opened window, using CTRL key on the desired object
- Click Add Object button, to add the object to the OR
- Repeat the step 1 to step 3 for all of your objects
- Once adding all objects then associate the OR to your Test script
- Now, start drag & drop for each of the object sequentially according to your application flow
- Finally, start passing test data from external sources like excel sheet, MS access or SQL server to run your test script with different multiple test data. NOTE: For initial practice you can use default DataTable Keyword to pass the Test Data to your test script
Understand UFT Tool Features/Overview Menu Wise
Once you have installed the UFT either licensed or trial version (valid for few days around 60 days) then you can have a logo as shown here.
Follow the steps to create a Test script in UFT
Follow the steps to create a Test script in UFT
1. Click on the UFT logo to open the tool

2. Add-In Manager window will be shown with the add-Ins you have selected during the installation process. Now, select the Add-in (Example: Web) that you would like to work on the type of application that you have desired and click Ok button

3. You will be landed on UFT Home screen with different Bars, Tabs and Panes as shown here

4. To create a new test script, select File >> New >> Test Menu and then select the Type of Test (Example: here select GUI Test and give a appropriate name to your script and click Create button

Now, will TAKE A TOUR to know about the UFT features/overview Menu wise
FILE Menu

Select File >> New – creates a new test script
Select File >> Open – Opens a windows explorer to view the existing test scripts
Select File >> Add – Opens a option to select new test script as well as to view the existing test scripts
Select File >> Close – Closes opened test script
Select File >> Close Solution – Closes opened test script along with test resources
Select File >> Save [Test script] – Saves opened test script
Select File >> Save [Test script] As – Prompts to provide another name to opened test script
Select File >> Save All – Saves opened test script along with test resources
Select File >> Save (Other) – Saves opened test script along with test resources in ALM
Select File >> Recent – Opens a recently opened test scripts
Select File >> Settings – Opens a Settings dialog box to provide customized settings on the opened test script
File >> Settings>>Properties

Select File >> Settings>>Properties – You can select or deselect the selected Add-Ins by clicking Modify button, based on your requirement. For example if you selected multiple add-ins then here in the settings properties you will have provision to select or deselect as per your choice.
Generate Script – It generates you an automation script on the test settings part. This code will help you to do the settings during run time instead of you doing before execution of the test script using manual intervention.
File >> Settings>>Run

Select File >> Settings>>Run – By default the iterations will be “Run all rows”. Suppose your test data has multiple rows then the test script will run for all the rows you have given.
Run one iteration only – Suppose you want to restrict to execute one row test data then do the necessary settings before executing the test script otherwise you can handle the same using the automation code.
Run from row [Row number] to row [Row number] – Choose if you want to execute few test data rows for your test script
When error occurs during run session – you will have multiple choices to select when error found while your test script is running
o Pop Up message box - A pop up displays with the error details
o Proceed to next action iteration – Exit the current action and switch to next action iteration
o Stop run – Stops run completely
o Proceed to next step – Proceed to next statement if it found an error at current statement
Object Synchronization – Synchronization is a waiting time to load or render the object on to the web page. Here UFT waits for the browser to load the object that you are working one. It’s a mutually waits in order to load and recognize the object that you wanted the object to do some task. Here by default the synchronization timeout has given as 20 seconds. You can change these settings based on the latency or performance of your application.
Smart Identification – If the UFT found the similar object description on more than one object then in order to identify these similar objects uniquely one should use smart identification feature.
Save Image – Choose the option if you have to save the desktop image when error occurs
File >> Settings>>Resources

Select File >> Settings>>Resources – Associate all your library functions either stored in your local drive or HP ALM (test data management tool, Test Plan is the module location where your automation test scripts will be available) to your test script
NOTE: Here, while associating UFT asks your choice to store these files with Absolute or Relative path
Data Table: UFT has default excel sheet i.e, Data Table where you can use this feature to store the test data just as a excel sheet. These test data will be picked during run time based on the logic you applied in the test script
Or else, if you are using any external files such as excel sheet then provide that path under Other location option provided by the UFT and click OK button to apply your settings to the current test script.
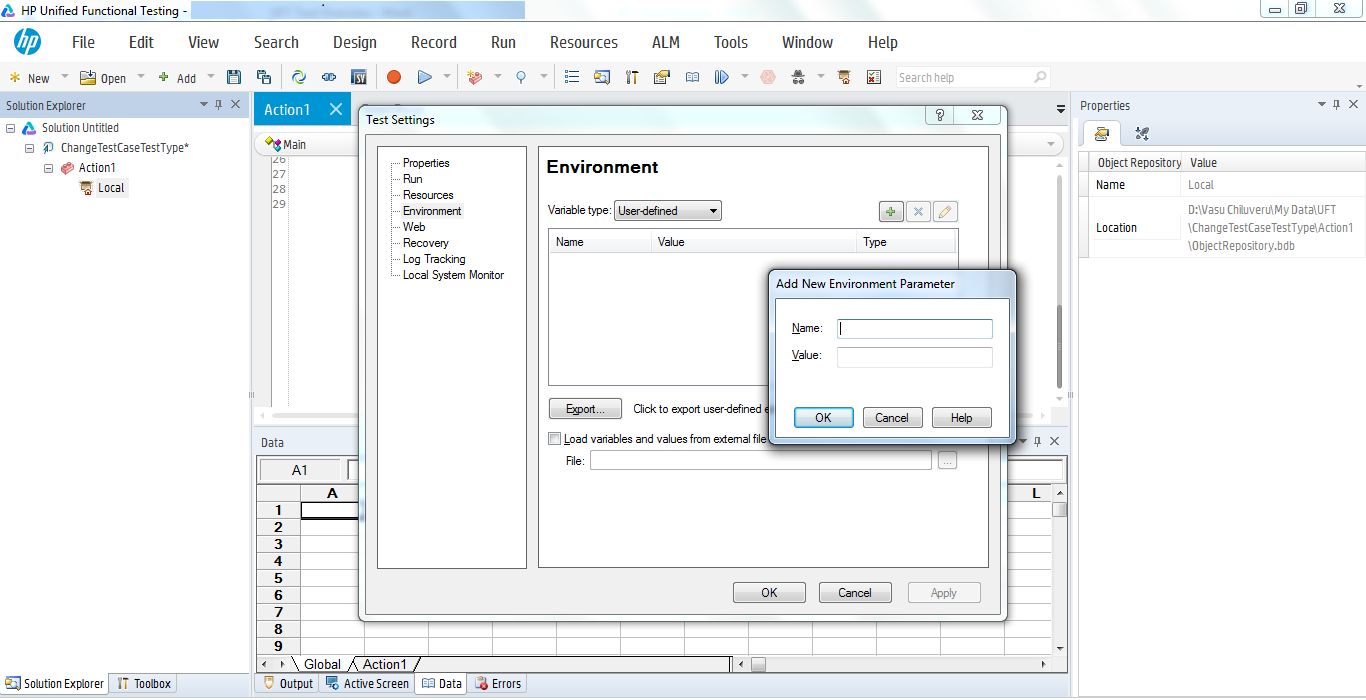
File >> Settings>>Environment

Select File >> Settings>>Environment – Environment variables are of two kinds. Those are built-In and user-defined. Built-Ins are those variable that were provided by the UFT and user-defined are those that were defined by the user. There so many listed by UFT, based on your requirement make use of them
Examples on Built-In:
1. Msgbox Environment.Value(“ActionIteration”)
2. Msgbox Environment.Value(“ActionName”)
3. Msgbox Environment.Value(“OS”)
4. Msgbox Environment.Value(“OSVersion”)
2. Msgbox Environment.Value(“ActionName”)
3. Msgbox Environment.Value(“OS”)
4. Msgbox Environment.Value(“OSVersion”)
Examples on user-defined: Once you click on + symbol a pop up would open where it asks you to provide the Nameand Value. Provide the details and click on OK button to apply. Basically, we use these options when user wants to pass any constant values to pass into the test script during run time
1. Msgbox Environment.Value(“CompanyName”)
2. Msgbox Environment.Value(“CompanyBadgeID”)
Here variables CompanyName and CompanyBadgeID are given against Name label and corresponding input will be provided against Value label. These values will be displayed if you use the code mentioned as shown in the example.
Load variables and values from external file – other option given to provide the list of user-defined variables in one go by specifying that file path.

Select File >> Settings>>Web – The default browser navigation timeout is 60 seconds , else you have choice of changing the timeout based on your application latency or performance.

Select File >> Settings>>Recovery – Recovery Scenario, apart from your application navigation / flows according to your business functionality if there are any intermittent/unexpected pop ups/ dialogue boxes / child pages appears then you have to use the Recovery scenarios that are provided by the UFT.
Here you need to take a wise decision based on the type of recovery scenario that you experienced. Mostly, intermittent/unexpected situation happens on same page and never know after how many iterations it would appear and another scenario is you don’t know even which page it would appear or when and how. Based on your experience you have to use Activate recovery scenarios options provided by the UFT (Example: On error option from the Activate recovery scenarios drop down shown) and click OK button to apply the Recovery scenario(s) to your test script.
You will learn Recovery Scenario creation later point in time with more details.
File >> Settings>>Log Tracking

Select File >> Settings>>Log Tracking – Check the box if you wanted to have log messages to the run results
File >> Settings>>Local System Monitor

Select File >> Settings>>Local System Monitor – Enable local system monitoring every second if you want to monitor the local system performance
Select File >> Export Test – Opened test script would be exported to desired location
Select File >> Import Test – Opened test script would be imported to UFT coding pane
Select File >> Exit – UFT closes itself and closed all opened test script and other test resources (prompt to save if anything is not saved)
EDIT Menu

Select Edit >> Undo – Reverse your last action performed by you
Select Edit >> Redo - Reverse your more than one action performed by you
Select Edit >> Cut – Takes out the statement(s) selected
Select Edit >> Copy – Takes a copy of the statement(s) selected
Select Edit >> Paste – The statement(s) selected by Cut or Copy will be pasted
Select Edit >> Delete - Delete the selected statement(s)
Select Edit >> Format>>Comment – The comment will be denoted by apostrophe (‘) symbol. You can action the same for single or multiple statements
Select Edit >> Format>>Uncomment – Deselects the comment placed
Select Edit >> Format>>Indent – Adjust or aligns the code for easy readability
Select Edit >> Format>>Outdent – Undo the Indent
Select Edit >> Format>>Complete Word – Provides the information to complete the statement
Select Edit >> Format>>Argument Info – Provides the information related to the arguments or parameters
Select Edit >> Format>>Apply “With” to Script – The similar statements found in your code use these feature for more readability
Select Edit >> Format>>Remove “with” Statement – Undo the Code that is applied to “With” Keyword

Select Edit >> Code Snippet>>If…Then – Shows you the If … Then syntax to write the code that conditional block
Select Edit >> Code Snippet>>ElseIf…Then – Shows you the If … Then syntax to write the code that conditional block
Select Edit >> Code Snippet>>Else – Shows you the Else syntax to write the code that conditional block
Select Edit >> Code Snippet>>While … Wend – Shows you the While … Wend syntax to write the code that conditional block
Select Edit >> Code Snippet>>For … Next – Shows you the For … Next syntax to write the code that conditional block
Select Edit >> Code Snippet>>Do …While – Shows you the Do …While syntax to write the code that conditional block
Select Edit >> Code Snippet>>Do …Until – Shows you the Do …Until syntax to write the code that conditional block
VIEW Menu

Select View>>Solution Explorer – Displays the hierarchy of the Test case with their actions and object repositories
Select View>>Toolbox – Displays the list of all Library, local function and the list of all the Objects that are associated to the Object Repositories
Select View>>Properties – Displays the Action Name, Location, Parameter of the selected Actions or Object Repositories
Select View>>Data – Displays default Data Table of the UFT
Select View>>Output – Displays output checkpoint values
Select View>>Errors – Displays all related errors of the opened test script
Select View>>Active Screen – Will display the active screen if the option is checked in the setting while you have selected relevant object
Select View>>Debug>>Breakpoints – Breakpoints are used to pause the execution in the middle for you to investigate or watch the values during run time.
Select View>> Debug>>Call Stack – Display the sequence of calls your script has made up until that point.
Select View>> Debug>>Loaded Modules – Display the loaded modules your script has made up until that point.
Select View>> Debug>>Threads - Display the threads your script has made up until that point.
Select View>> Debug>>Local Variables - Display the local variables your script has made up until that point.
Select View>> Debug>>Console – Displays the output on console
Select View>> Debug>>Watch – Displays the current value of variable added
Select View>> Debug>>Tasks – Tasks that has to perform in future will be displayed
Select View>> Debug>>Search Results – Displays the search results
Select View>> Debug>>Bookmarks – Bookmarks would be displayed
Select View>> Debug>>Test Flow – Test Flow would be displayed
Select View>> Debug>>Run Step Results – Run Step Results would be displayed
Select View>> Debug>>Keyword View – Keyword view would be displayed
Select View>> Debug>>Start Page – Display the Stat page
Select View>> Debug>>Last Run Results – Display the last run results
Select View>> Debug>>Reset Window Layout – Will the reset the Window Layout
Select View>> Debug>>Switch To BPT View – Switch to BPT View from Test script view
SEARCH Menu

Select Search >> Find – To search desired text
Select Search >> Replace – To search desired text and replace with the text provided to replace with
Select Search >> Incremental Search – Search the desired text in forward direction continuously
Select Search >> Reverse Incremental Search - Search the desired text in backward direction continuously
Select Search >> Bookmarks – Bookmarks are used for future purpose
Select Search >> Go To >> Location – Places you on the line location you wanted
DESIGN Menu

Actions - Actions, are the re-usable code (brunch of statements) that can be used wherever you wanted. You can use the Actions multiple time as required based on the business logic.
Actions are of three types.
- Call to New Action
- Call to Copy of Action
- Call to Existing Action
Select Design >> Call to New Action – It creates a new action in order to make these action as reusable or non-reusable based on the user choice during creation
Select Design >> Call to Copy of Action – It creates a duplicate action of an existing action. Newly created action can be made modification to the code that is already there but existing will not get impacted with modification made to the new action.
Select Design >> Call to Existing Action – It calls existing action and works as reusable components. Will be used as it wherever you have called.
Select Design >> Call to Existing API Test / Action - It calls existing API Test and Action and works as reusable components. Will be used as it wherever you have called.
Select Design >> Checkpoint>>Existing Checkpoint – Validations on any text checkpoint can be created and also get the list of existing checkpoints created already
Select Design >> Checkpoint>>Database Checkpoint - Validations on any Database checkpoint can be created and also get the list of existing checkpoints created already
Select Design >> Checkpoint>>XML Checkpoint - Validations on any XML checkpoint can be created and also get the list of existing checkpoints created already
Select Design >> Checkpoint>>File Content Checkpoint - Validations on any File Content checkpoint can be created and also get the list of existing checkpoints created already

Select Design >> Output Value>>Existing Output Value – Existing Output value will be displayed
Select Design >> Output Value >>Database Output Value – Database Output value will be displayed
Select Design >> Output Value >>XML Output Value - XML Output value will be displayed
Select Design >> Output Value >>File Content Output Value – File Content Output value will be displayed
Select Design >>Start Transaction – Place the start transaction at the beginning of your test script
Select Design >>End Transaction - Place the End transaction at the beginning of your test script. The difference of end and start transaction would be your execution time of you test script.
Select Design >>Check Syntax – Checks any syntax and notifies you if there are any errors to your test script
Select Design >>Step Generator – Step Generator, there are 3 kinds of Categories
2. Utility Objects
3. Functions (as shown in below snapshot)
a. Library Functions
b. Built-In Functions
c. Local Functions

Utility Objects and their Objects & Operations, see in below snapshot

Functions and their Built-In Library Functions & Operations, see in below snapshot

Steps to use Step Generator
- Select Design >>Step Generator
- Select any one category
- Choose any one library or Object
- Select any one operation
- In the arguments section provide Name, Type and Value
- Optional, select Return value option if required
- You will have code generated automatically under Generated Step section
- Click OK button to add this step to your test script and you want more code to append then select the Insert another step
- Finally, click on OK button to close the Step Generator

There are two types functions definition generator are available
1. Function
2. Sub
Both are similar but function can return a single value wherever they were called nevertheless Sub can’t. Both uses multiple parameters. Here to the parameter you can use below keywords additionally.
ByRef – Provides a pointer to the variable and any changes are reflected anywhere that variable is used. Simply, changed value will be returned though wherever it will be called.
ByVal - Provides a copy of a variable to a routine (sub or function), so any changes to that variable will not be reflected in the original routine (sub or function). Simply, changed value scope will be to that sub or function only.
Example:
valueA=10
valueB=30
Msgbox valueB
Msgbox valueA
Public Function NewFunction (ByRef valueA, ByVal valueB)
valueB= valueB +10
valueA=valueA+10
Msgbox valueB
Msgbox valueA
End Function
Output: valueA valueB
Main 20 30
Function 20 40
Steps to use Function Definition Generator
2. Provide new function name to the function definition
3. You will have to options Function or Sub from Type drop down
4. Select the Scope either Public or Private
- Public – Will have scope to the entire test script or across Actions
- Private – Will have scope to the current block or function or to that Action
6. Then based on your selection code will be generated under Preview section
7. Select Insert another function generator if you want more else click OK button to get the append this code to your test script
RECORD Menu

Select Record>>Record – Will do the recording as per your navigation/triggers on chosen applications that you made
Select Record>>Web Event Recording Configuration – You can set Web Event recording configuration levels as per your desire using Custom Settings button

Select Record>>Record And Run Settings – Based on the add-in you selected, those list of add-in will be displayed in separate tabs (Example: Web tab is displayed below along with their settings as shown below)
Settings / Features are very easy for you to understand. Mainly, two things you should know.
1. Record or run test on any open browser – Opens the URL on the opened browser only
2. Open the following when a record or run session begins - Here you have provide Browser and Address fields in order to open the URL on the specified browser

RUN Menu

NOTE: To have debugger features you should have Microsoft debugger installed separately in your local machine
Also, RUN Modes are of three types were discussed below
- 1. Default Run Mode
- 2. Maintenance Run Mode
- 3. Update Run Mode
Select Run >> Run – You will be prompting with two options on Results Location tab on Run window as shown below. It’s a normal/default RUN, starts execution from begining of the step to last step of your test script.

1. New run results folder – It will show the path where test script is stored (either your local drive or ALM path would be shown) and there itself results folder will be created. Now, you can click RUN button to execute you test script
2. Temporary run results…… If you don’t want to store your test results either on your local drive or in ALM path, choose this option and click on RUN button to execute you test script
Select Run >> Run Now – Will run your test script immediately
Select Run >>Recent Reports – Will be shown your recent test results reports
Select Run >>Step Into – Executes line by line and resumes for your action to move forward
Select Run >>Maintenance Run Mode - During run session Maintenance Run Mode helps you to update the test objects in the object repositories associated to your test script or component when UFT cannot locate one or more objects in your application.
Select Run >>Update Run Mode - Updates all properties of objects and checkpoints in case of failures
Select Run >>Run Current Action – Executes the desired Action only
Select Run >>Run from Step – Execute the test script from the beginning or location you specified until reaches the breakpoints you specified
Select Run >>Run to Step - Execute the test script till last step or up to the breakpoints you specified from the location you started the execution
Select Run >>Debug from Step – Execute the test script from the location you wanted and executes up to the last step or until the breakpoints you specified line by line
Select Run >>Insert/Remove Breakpoint – Insert or removes the breakpoints(s)
Select Run >>Enable/Disable Breakpoint - Enable or disable the breakpoints(s)
Resources Menu

NOTE: Object Repository are of two kinds, Local and Global/Shared Object Repository
Select Resources>>Object Repository – Object Repository is used to spy the application objects and store them in order to use these objects during design the automation code. Local object repository mainly comes into picture when you are using Actions to your test script otherwise not required
Select Resources>>Object Repository Manager - It’s facilitates you to create a global object repository like said above it will be used to store the GUI objects and helps you to store in your local desktop or in the ALM for future reference for your coding.
It also helps to add all the objects in one go as well and also helps you to merge two object repositories at a single instance.
Select Resources>>Associate Repositories – It facilitates you to map the object repository to the actions or test script
Select Resources>>Map Repository Parameters - It facilitates you to map the parameters to the object repository
Select Resources>>Recovery Scenario Manager…. It facilitates you to map the recovery scenarios, to create the scenarios etc., Details steps to create Recovery Scenario were discussed here later section below
ALM Menu
ALM Connection on UFT – Interaction of HP ALM & HP UFT
Select ALM>>ALM Connection… - Once you select it will populate with another window to you to provide the ALM Server URL, User name, Password as shown below and also details with Domain and Project details. Choose the appropriate as per project you involved and click Login button to interact with ALM Test Plan module.

Restore connection on startup – If you desired to restore the ALM connection as soon as UFT icon is clicked then choose the option here itself.
Tools Menu

Select Tools >> Object Spy… Once you select it will provide you Object Spy (1st icon – pointing hand) window, using Hand Symbol you have to locate the application GUI objects and if want the object to add to OR permanently you have + icon (3rd icon – add object to the repository) which is beside it.
2nd icon (highlight in application) is to highlight object in the application.
4th icon is used to copy the identification properties to the clipboard

Select Tools >> Object Identification – Based on the add-in selected and the default add-in will be listed under Environment drop down. Based on the selection respective Test Object Classes will be displayed. Try selecting any Test Object Class then you will be seeing the Mandatory and Assistive Properties correspondingly.
Ordinal Identifier – In general when you execute the test script by default UFT identifies the object by Index or Location of the object.
Enable Smart Identification – We already discussed in File >> Settings
Generate Script – It will provide automating code to you related to Object Identifications this code will help you in future

Select Tools >> Regular Expression Evaluator… Regular expression are those when we see a dynamic value change in the application then you need to use regular expressions in order to make the object(s) identify in future as well without any issue when you execute at 1000 time too.
Regular Expression Evaluator window helps you to provide your regular expression and see the behavior by providing the sample text

Select Tools >> Data Driver – Use Add Value button and provide parameters, these constants value you wanted will be automatically added to "Action 1" in your default Data Table.
NOTE: the first tab is the global sheet
NOTE: the first tab is the global sheet


Select Tools >>Virtual Object>>New Virtual Object – Details steps are available below in order to create Virtual Object.
Virtual Object will be created only when the UFT doesn’t recognize though it has seen as lets say Button by human eye. Likewise, any GUI object if it is not recognized use Virtual Object.
Select Tools >>Virtual Object>>Virtual Object Manager – Display the list of Virtual Objects created already.
Steps to Create Virtual Object
1. Select Tools >>Virtual Object>>New Virtual Object

2. Click Next button Welcome Virtual Object Window
3. Select any desired Class from Map to a Standard Class window and click Next button

4. Click on Mark Object in order to spy that desired object and click Next button as shown in the below snap.

5. Now, Select Parent only or Entire parent hierarchy based on the newly selected object hierarchy and click Next button

6. Save Virtual Object. Here choose option if you want to add further more virtual object by Yes or No and finally click on Finish button

Select Tools >> GUI Testing>> General – Suggest you to familiar with the options you have in General tab and use them based on the project requirement

Select Tools >> GUI Testing>> Test Runs - Suggest you to familiar with the options you have in Test Runs tab and use them based on the project requirement

Select Tools >> GUI Testing>> Text Recognition - Suggest you to familiar with the options you have in Text Recognition tab and use them based on the project requirement

Select Tools >> GUI Testing>> Folders - Suggest you to familiar with the options you have in Folders tab and use them based on the project requirement

Select Tools >> GUI Testing>> Active Screen - Suggest you to familiar with the options you have in Active Screen tab and use them based on the project requirement

Select Tools >> GUI Testing>> Screen Capture - Suggest you to familiar with the options you have in Screen Capture tab and use them based on the project requirement. Mostly related to screen or movie capture

Select Tools >> GUI Testing>> Insight - Suggest you to familiar with the options you have in Insight tab and use them based on the project requirement.

Select Tools >> GUI Testing>> Remote Connection - Suggest you to familiar with the options you have in Remote Connection tab and use them based on the project requirement. It will be useful when you wanted to execute the test scripts in remote machine. Here you need to have required SSL certificates in your local machine

Select Tools >> GUI Testing>> Web >>General - Suggest you to familiar with the options you have in Generaltab and use them based on the project requirement.

Select Tools >> GUI Testing>> Web >>Page/Frame Options - Suggest you to familiar with the options you have in Page/Frame Options tab and use them based on the project requirement.

Select Tools >> GUI Testing>> Web >>Advanced - Suggest you to familiar with the Accessibility Checkpointoptions you have in Advanced tab and use them based on the project requirement.

Recovery Scenario - Apart from your application navigation / flows according to your business functionality if there are any intermittent pop ups/ dialogue boxes / child pages appears then you have to use the Recovery scenarios that are provided by the UFT.
Here you need to take a wise decision based on the type of recovery scenario that you experienced. Mostly, intermittent situation happens on same page and never know after how many iterations it would appear and another scenario is you don’t know even which page it would appear or when and how. Based on your experience you have to use Activate recovery scenarios options provided by the UFT (Example: On error option from the Activate recovery scenarios drop-down shown) and click OK button to apply the Recovery scenario(s) to your test script.
Here are the steps involved in creating the Recovery scenario(s).

1. Click New Scenario icon on the above snapshot

2. Choose the Next button

3. Select the desired Trigger Event listed as Radio button as per your requirement and click Next button

4. Now, specify the unexpected Pop window that you experienced with the help of HandSymbol button. Then it automatically captures the Window Title and also text contains in it. Here you can use Regular Expression if you wanted to pick the pop up dynamically and click on Next button.

5. Click Next button and provide the Operation Type you wanted to perform an action according to your need and click Next button on the Recovery Operation window


6. Now, select Click Button or Press Key options (Select Keyboard or Mouse operations) and click Next button

7. Then, you will be prompted for another recovery scenario if you wanted to add and click Next button

8. Provide any one from the list of Test run options as a post-recovery event to be performed and click Next button

9. Title to your recovery scenario created and click Next button

10. Finally, based on your requirement or choice you can choose Add scenario to current test and also Add scenario to default test settings and click Finish button.
Regular Expressions or Wild Cards
Regular expressions were used when there will be a dynamic text appears to be validated. To perform validations on dynamic texts you have to use the wild cards. Namely, you have few in UFT they will be donated by some special charters, those are *, /, |, ? etc.,
List of Wild Cards
| Symbol | Description |
|---|---|
| \ | Marks the next character as a special character, a literal, a backreference, or an octal escape. For example, 'n' matches the character "n". '\n' matches a newline character. The sequence '\\' matches "\" and "\(" matches "(". |
| ^ | Matches the position at the beginning of the input string. If the RegExp object's Multiline property is set, ^ also matches the position following '\n' or '\r'. |
| $ | Matches the position at the end of the input string. If the RegExp object's Multiline property is set, $ also matches the position preceding '\n' or '\r'. |
| * | Matches the preceding character or subexpression zero or more times. For example, zo* matches "z" and "zoo". * is equivalent to {0,}. |
| + | Matches the preceding character or subexpression one or more times. For example, 'zo+' matches "zo" and "zoo", but not "z". + is equivalent to {1,}. |
| ? | Matches the preceding character or subexpression zero or one time. For example, "do(es)?" matches the "do" in "do" or "does". ? is equivalent to {0,1} |
| {n} | n is a nonnegative integer. Matches exactly n times. For example, 'o{2}' does not match the 'o' in "Bob," but matches the two o's in "food". |
| {n,} | n is a nonnegative integer. Matches at least n times. For example, 'o{2,}' does not match the "o" in "Bob" and matches all the o's in "foooood". 'o{1,}' is equivalent to 'o+'. 'o{0,}' is equivalent to 'o*'. |
| {n,m} | m and n are nonnegative integers, where n <= m. Matches at least n and at most m times. For example, "o{1,3}" matches the first three o's in "fooooood". 'o{0,1}' is equivalent to 'o?'. Note that you cannot put a space between the comma and the numbers. |
| ? | When this character immediately follows any of the other quantifiers (*, +, ?, {n}, {n,}, {n,m}), the matching pattern is non-greedy. A non-greedy pattern matches as little of the searched string as possible, whereas the default greedy pattern matches as much of the searched string as possible. For example, in the string "oooo", 'o+?' matches a single "o", while 'o+' matches all 'o's. |
| . | Matches any single character except "\n". To match any character including the '\n', use a pattern such as '[\s\S]. |
| (pattern) | Matches pattern and captures the match. The captured match can be retrieved from the resulting Matches collection, using the SubMatches collection in VBScript or the $0$9 properties in JScript. To match parentheses characters ( ), use '\(' or '\)'. |
| (?:pattern) | Matches pattern but does not capture the match, that is, it is a non-capturing match that is not stored for possible later use. This is useful for combining parts of a pattern with the "or" character (|). For example, 'industr(?:y|ies) is a more economical expression than 'industry|industries'. |
| (?=pattern) | Positive lookahead matches the search string at any point where a string matching pattern begins. This is a non-capturing match, that is, the match is not captured for possible later use. For example 'Windows (?=95|98|NT|2000)' matches "Windows" in "Windows 2000" but not "Windows" in "Windows 3.1". Lookaheads do not consume characters, that is, after a match occurs, the search for the next match begins immediately following the last match, not after the characters that comprised the lookahead. |
| (?!pattern) | Negative lookahead matches the search string at any point where a string not matching pattern begins. This is a non-capturing match, that is, the match is not captured for possible later use. For example 'Windows (?!95|98|NT|2000)' matches "Windows" in "Windows 3.1" but does not match "Windows" in "Windows 2000". Lookaheads do not consume characters, that is, after a match occurs, the search for the next match begins immediately following the last match, not after the characters that comprised the lookahead. |
| x|y | Matches either x or y. For example, 'z|food' matches "z" or "food". '(z|f)ood' matches "zood" or "food". |
| [xyz] | A character set. Matches any one of the enclosed characters. For example, '[abc]' matches the 'a' in "plain". |
| [^xyz] | A negative character set. Matches any character not enclosed. For example, '[^abc]' matches the 'p' in "plain". |
| [a-z] | A range of characters. Matches any character in the specified range. For example, '[a-z]' matches any lowercase alphabetic character in the range 'a' through 'z'. |
| [^a-z] | A negative range characters. Matches any character not in the specified range. For example, '[^a-z]' matches any character not in the range 'a' through 'z'. |
| \b | Matches a word boundary, that is, the position between a word and a space. For example, 'er\b' matches the 'er' in "never" but not the 'er' in "verb". |
| \B | Matches a nonword boundary. 'er\B' matches the 'er' in "verb" but not the 'er' in "never". |
| \cx | Matches the control character indicated by x. For example, \cM matches a Control-M or carriage return character. The value of x must be in the range of A-Z or a-z. If not, c is assumed to be a literal 'c' character. |
| \d | Matches a digit character. Equivalent to [0-9]. |
| \D | Matches a nondigit character. Equivalent to [^0-9]. |
| \f | Matches a form-feed character. Equivalent to \x0c and \cL. |
| \n | Matches a newline character. Equivalent to \x0a and \cJ. |
| \r | Matches a carriage return character. Equivalent to \x0d and \cM. |
| \s | Matches any white space character including space, tab, form-feed, and so on. Equivalent to [ \f\n\r\t\v]. |
| \S | Matches any non-white space character. Equivalent to [^ \f\n\r\t\v]. |
| \t | Matches a tab character. Equivalent to \x09 and \cI. |
| \v | Matches a vertical tab character. Equivalent to \x0b and \cK. |
| \w | Matches any word character including underscore. Equivalent to '[A-Za-z0-9_]'. |
| \W | Matches any nonword character. Equivalent to '[^A-Za-z0-9_]'. |
| \xn | Matches n, where n is a hexadecimal escape value. Hexadecimal escape values must be exactly two digits long. For example, '\x41' matches "A". '\x041' is equivalent to '\x04' & "1". Allows ASCII codes to be used in regular expressions. |
| \num | Matches num, where num is a positive integer. A reference back to captured matches. For example, '(.)\1' matches two consecutive identical characters. |
| \n | Identifies either an octal escape value or a backreference. If \n is preceded by at least n captured subexpressions, n is a backreference. Otherwise, n is an octal escape value if n is an octal digit (0-7). |
| \nm | Identifies either an octal escape value or a backreference. If \nm is preceded by at least nm captured subexpressions, nm is a backreference. If \nm is preceded by at least n captures, n is a backreference followed by literal m. If neither of the preceding conditions exist, \nm matches octal escape value nm when n and m are octal digits (0-7). |
| \nml | Matches octal escape value nml when n is an octal digit (0-3) and m and l are octal digits (0-7). |
| \un | Matches n, where n is a Unicode character expressed as four hexadecimal digits. For example, \u00A9 matches the copyright symbol (©). |
These Wild Cards helps you to write the automation code or helps you in solving the object property issues or majority in order to identify the objects that has impacted due to the dynamic text changes, will use these wild cards either in Object Repository (OR) or in the automation code. These approaches are given below.
Approach 1 - Using Regular Expressions at Automation code level
As said, earlier one can automate using only Regular Expressions without OR. Here is the example how the code will be seen without OR.
Example using Object Repository (OR) will look like as shown below
Browser("Google Home").Page("Search Page").WebEdit("Search").Set "Vasu Chiluveru"
 |
| Browser Object and properties |
 |
| Page Object and properties |
 |
| Edit Object and properties |
Example using Wild Cards or Regular Expressions will look like as shown below and shown varieties of its usage as well
1. With Single parameter
Browser("title:=Google - Internet Explorer").Page("title:=Google").WebEdit("name:=q").Set "Vasu Chiluveru"
2. With multiple parameters along without Wild Card usage
Browser("title:=Google - Internet Explorer").Page("title:=Google").WebEdit("name:=q","html tag=INPUT").Set "Vasu Chiluveru"
Browser("title:=Google *").Page("title:=Google").WebEdit("name:=q","html tag=INPUT").Set "Vasu Chiluveru"
Approach 2 - Using regExp keyword in the automation code
Another approach of using Regular expressions using regEx as shown below
Set regEx = New RegExp
Example: Validating the actual pattern with the given String
Function Code
Function RegExpTest(patrn, strng)
   Dim regEx, Match, Matches   ' Create variable.
   Set regEx = New RegExp   ' Create a regular expression.
   regEx.Pattern = patrn   ' Set pattern.
   regEx.IgnoreCase = True   ' Set case insensitivity.
   regEx.Global = True   ' Set global applicability.
   Set Matches = regEx.Execute(strng)   ' Execute search.
   For Each Match in Matches   ' Iterate Matches collection.
      RetStr = RetStr & "Match found at position "
      RetStr = RetStr & Match.FirstIndex & ". Match Value is '"
      RetStr = RetStr & Match.Value & "'." & vbCRLF
   Next
   RegExpTest = RetStr
End Function
Main Code
MsgBox(RegExpTest("is.", "IS1 is2 IS3 is4"))
Approach 3 - Using the wild cards in Object Repository
Below used asterisk (star * symbol) if you wanted this object has to recognize even if you run on Internet Explore (IE) /Chrome/Firefox. If the Object Value is as "Google - Internet Explorer" then the Browser object is recognized on IE browser only.

See the Post for more information on the below topic.
VB script to Interact with Application Program Interfaces (API's) - CreateObject
VB script to Interact with Application Program Interfaces (API's) - CreateObject


Very valuable post...! This information shared is helpful to improve my knowledge skill. Thank you...!
ReplyDeleteOffshore software testing services
software testing services company
software testing services
Software Qa Services
quality assurance service providers
Performance testing services
Security testing services
software testing Companies
regression testing services
Thank you for sharing valuable information. Nice post. I enjoyed reading this post. The whole blog is very nice found some good stuff and good information here Thanks.
ReplyDeleteSoftware Testing Services
Functional Testing Services
Test Automation Services
QA Automation Testing Services
Regression Testing Services
API Testing Services
Compatibility Testing Services
Performance Testing Services
Security Testing Services
Vulnerability Testing Services